ℹ️ This page is for Data Managers responsible for study design.
In OpenClinica, Form Designer is the built-in, no-code editor for case report forms (CRFs), also called electronic case report forms (eCRFs). You add questions, set each question's options, and preview the form as you build it. This reference explains every Form Designer setting: form layout, question options, response lists, grid widths, groups, translations, media, personal information items, and drafts.
If you are new to OpenClinica, read Building Forms in OpenClinica: Start Here first. New to Form Designer? Start with Build Your First Form in Form Designer, which walks you through building a simple form from start to finish. For features that need the spreadsheet, such as hard edit checks and cascading selects, see Build a Form with the Form Template.
Set Form-Level Options in Layout & Settings
In OpenClinica Form Designer, click Layout & Settings to open the settings that apply to the whole form.
Choose a Form Style
Under Form style, select one of four page types. New forms use Simple / Single page as the Default. Use this table to choose the style that fits who completes the form.
| Card | How the form looks | Best for |
|---|---|---|
| Simple / Single page | Each question is on its own row, all on one scrolling page. | Short forms and Participant-facing forms. |
| Simple / Multiple pages | Each question is on its own row. Each question, or each group of questions, appears on its own page. | Participant surveys, where one question at a time reduces mistakes. |
| Grid / Single page | Questions in a group can sit side by side in columns. All groups appear on one page. | Site-staff forms with many short fields, such as vital signs. |
| Grid / Multiple pages | Same as Grid / Single page, but each group appears on its own page. | Long site-staff forms divided into sections. |
Set the Form ID and Version
- Form ID: optional. An internal identifier for the form that is not shown to users. If you enter one, use letters, numbers, and underscores only. OpenClinica assigns the form's own identifier when the form is added to the study, so you do not need to fill this in.
- Version number: identifies this version of the form. Change it to create a new version instead of overwriting the current one. See Versions and Changing Forms After Go-Live.
Use the Toolbar
The toolbar at the top of OpenClinica Form Designer contains these buttons. Point to a button to see its name. Use this table to find the button for a task.
| Icon | Button | What it does |
|---|---|---|
 | Preview form | Opens the form in data entry view so you can test it. |
 | Expand / collapse questions | Shows or hides the details of every question. |
 | Create group with selected questions | Puts the selected questions in a new layout group. |
 | Add selected questions to library | Saves the selected questions to the library so they can be reused in other forms. |
 | Delete selected questions | Removes the selected questions. |
 | Duplicate selected questions | Copies the selected questions. |
 | Learn more about Form Designer | Opens this help article in a new browser tab. |
 | Manage Languages | Opens the language settings for the form. See Translate a Form into Other Languages. |
 | Add from Library | Inserts questions saved in the library. |
 | Layout & Settings | Opens the form style, Form ID, and Version number settings. |
Each question and group also has its own buttons: Edit (pencil) opens its settings, Delete removes it, Duplicate copies it, and Add to library saves it to the library.
Add and Arrange Questions
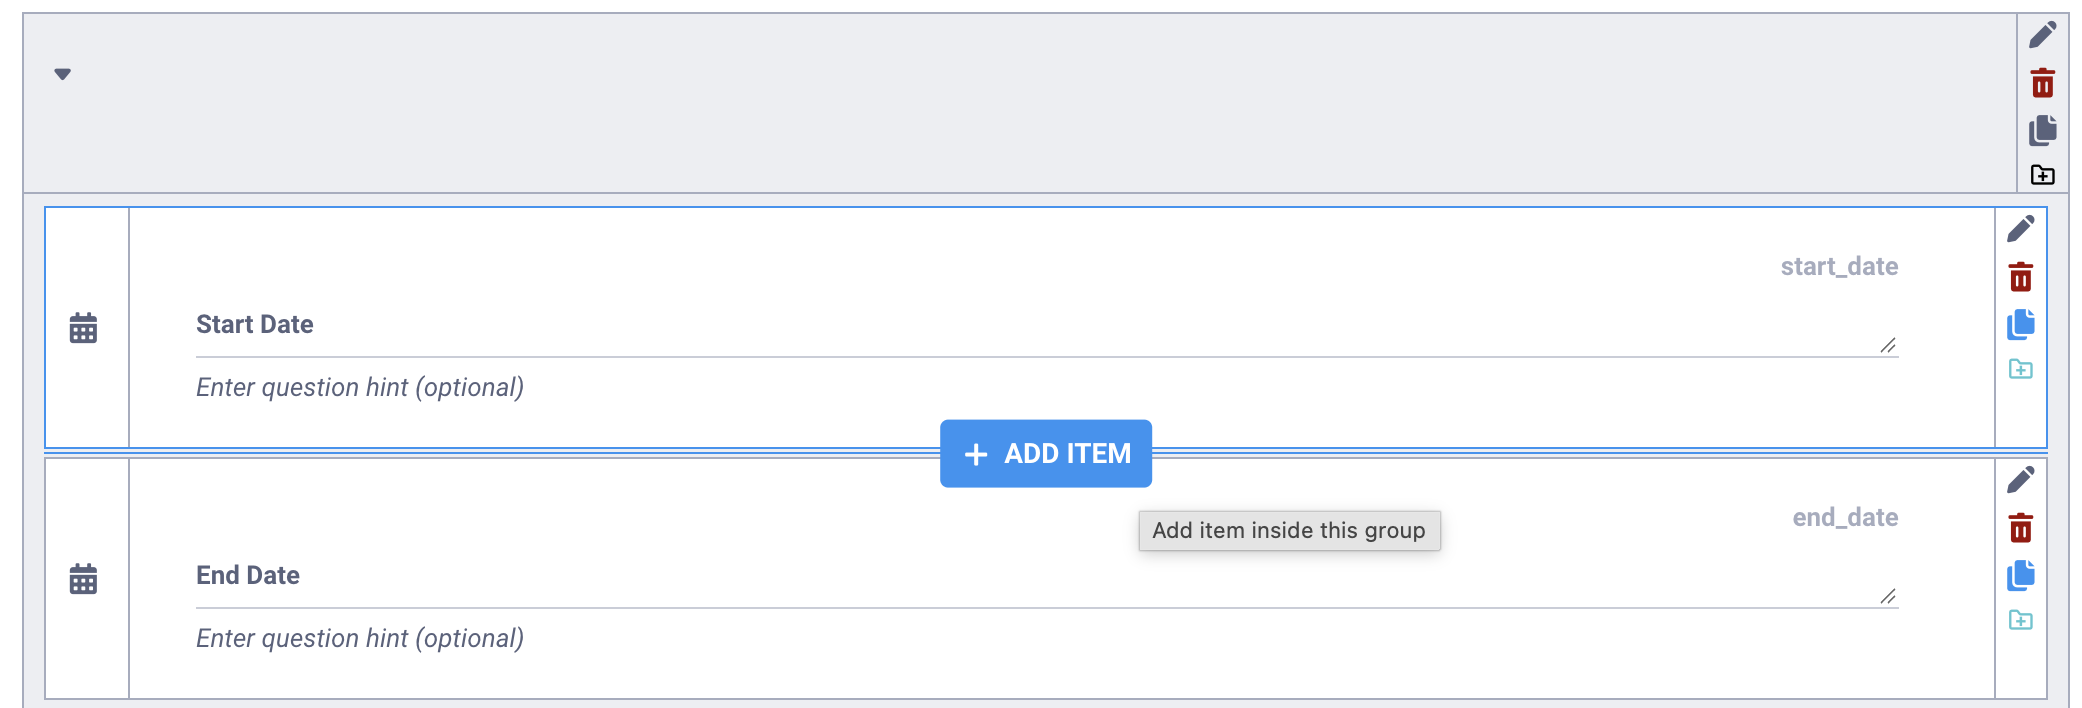
In OpenClinica Form Designer, the Add Item button adds a question at a specific place in the form.
- At the end of the form: the Add Item button below the last question is always visible.
- Between two questions: point to the space between the questions. The Add Item button appears only while you point to that space.
- Above the first question: point to the space above the first question of the form or of a group.
- Inside or after a group: a group has separate buttons for adding a question inside the group and after it. Point to a button to see where the question will go, for example Add item inside this group or Add item after this group. An empty group always shows an Add Item button inside it.
After you click Add Item, type the question text in the Enter question text box, click + Add Question, and select an item type. You cannot change the item type later, so check it before you continue. To use a different type, delete the question and add it again.
Set Question Options
In OpenClinica Form Designer, click the Edit (pencil) icon on a question to open its settings. The Question Options tab is always shown. The logic tabs (Relevant Logic for skip logic, Validation Criteria for edit checks, Required Logic, Default Value, and Calculation) appear depending on the item type and your choices. The logic tabs are described in Form Logic.
Write the Question Text and Hint
- Question text: type it on the question card. This is the question users see.
- Hint: optional help shown in italics under the question, such as "Enter weight in kilograms." Type it in the Enter question hint (optional) box on the card. Calculate items are not shown on the form, so they have no hint box.
You can format question text, hints, and response labels. See Item Types and Appearance Reference.
Complete the Question Options Tab
Use this table to fill in each field on the Question Options tab in Form Designer.
| Field | What it means | How to use it |
|---|---|---|
| Item Name | The item's internal name, like a variable name. It is used to build the item object identifier (OID) and appears in data extracts, but not on the form. | Filled in automatically from the question text, in lowercase with underscores for spaces. Change it to something short, such as sysbp. Logic and calculations refer to the item by this name, such as ${sysbp}. Use letters, numbers, and underscores, up to 40 characters, not starting with a number. |
| Short Display Name | A short label for the item in tables and listings. | Optional. Up to 40 characters. If blank, the Item Name is shown. |
| Required | Whether the user must answer. | Always, Never (the default), or Conditional. Conditional adds the Required Logic tab. Calculate items offer only Always and Never. |
| Item Group | The data set the item is stored in, like a dataset or domain, such as a Clinical Data Acquisition Standards Harmonization (CDASH) domain. Items that share an Item Group are kept together in the data model and in data extracts. It is separate from layout groups, which only change how the form looks. | Required. Use letters, numbers, and underscores, not starting with a number. All items in a repeating group must share one Item Group, and no item outside that group can use it. Hidden when Use External Value is set. |
| Item Description | A longer definition of the item for metadata and extracts. Not shown on the form. | Optional. Up to 3,999 characters. |
| Use External Value | Fills the item from data outside the form instead of from user entry. | Text items: contactdata or identifier (the Participant ID). Calculate items: clinicaldata, for values from other forms or events. |
| Appearance | How the item is displayed, such as a drop-down instead of radio buttons. | Optional. Select a card. See Item Types and Appearance Reference. |
| Item width | How much of a grid row the item takes up. | Grid styles only. See Set Item Width on Grid Forms. |
| Read only (under Advanced options) | Users can see the value but cannot change it. | Any item other than Calculate that has a calculation must be read only, unless a Triggered by item is selected. |
| External List Filename | The comma-separated values (CSV) file that supplies the choices. | Select One (External List) items only. |
Edit Response Options
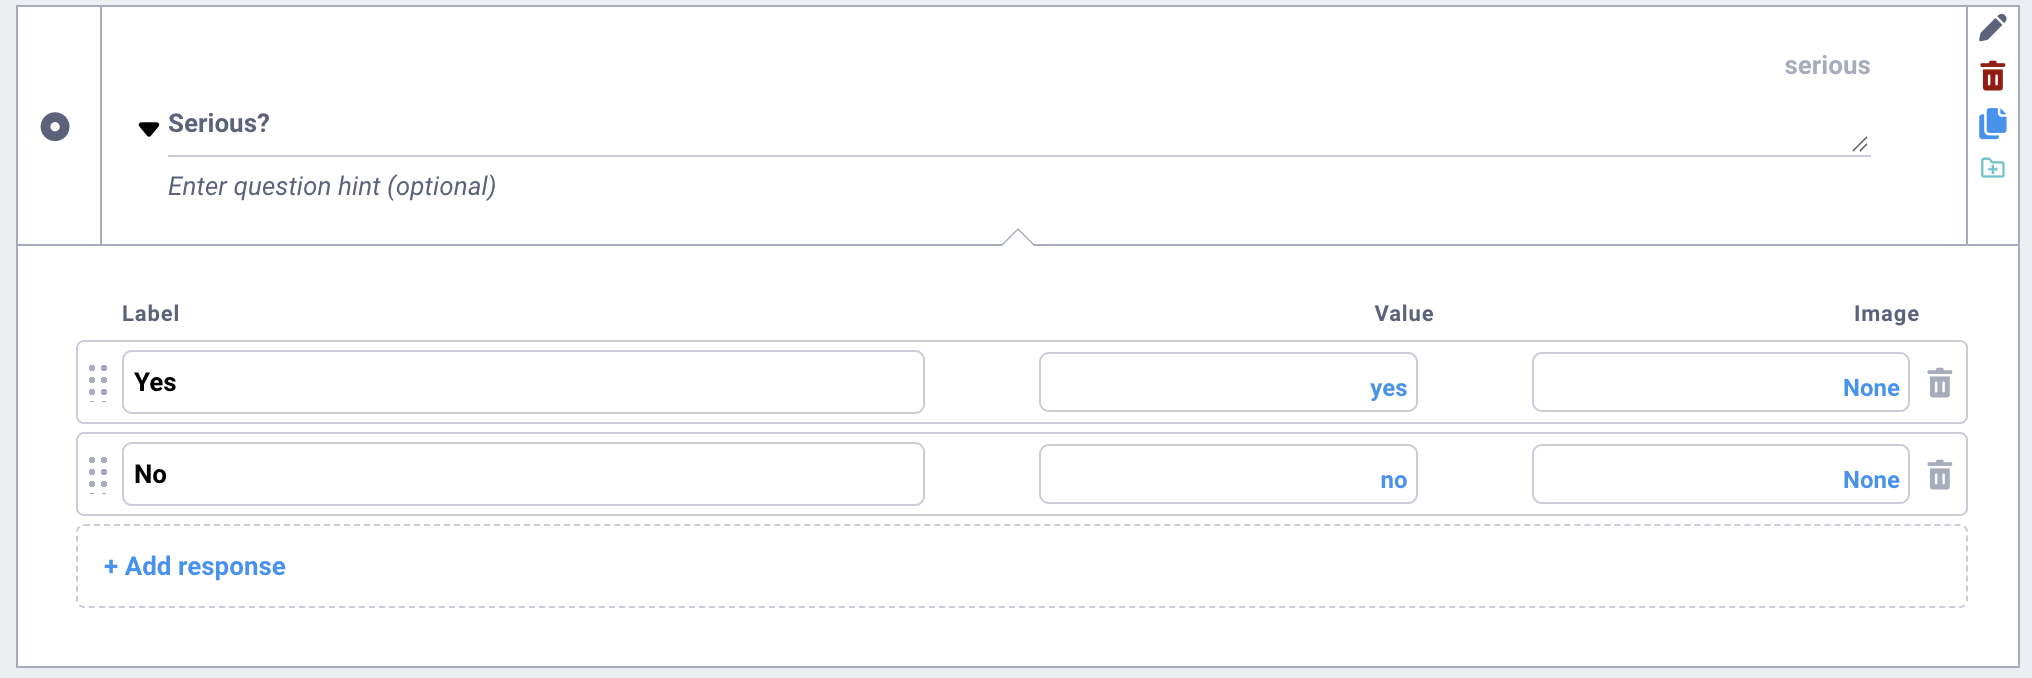
In OpenClinica Form Designer, Select One and Select Multiple items have a response list, also called a codelist. Each response is one row with three fields under the headings Label, Value, and Image.
- Label: the answer text users see.
- Value: the code stored in the database, such as 1 for Yes. Form Designer fills in values automatically (the field shows AUTOMATIC until a value is set). You can edit them. Values must be unique within the list.
- Image: an optional image shown with the answer, for example in an image grid. The field shows None when no image is set.
To work with the list:
- Add a response: click + Add response below the list.
- Reorder responses: drag the handle (dotted grip icon) at the left end of a row. A blue line shows where the response will go. Dragging anywhere else in the row does not move it.
- Delete a response: click the trash icon at the right end of the row. The response is removed immediately. The trash icon is hidden when only one response remains.
Set Item Width on Grid Forms
In OpenClinica Form Designer, use a Grid style and the Item width setting to put more than one question on a single line and to set how much of the line each question takes up. Each group is divided into columns: 4 by default. The Item width section of a question sets how many of those columns the question spans.
- In a 4-column group, the cards are Full width, 3/4 width, Half width, and 1/4 width.
- If the group uses a different number of columns, the cards read 1 of N, 2 of N, and so on.
Above the cards, a line of text tells you how many columns are available. For a question in a group, it reads Parent group (name) has N columns, where name is the group's Item Group, or its layout group name if it has none. For a question that is not in a group, it reads Form has 4 columns.
To change the number of columns in a group, use Columns in Grid in the group settings. See Group Questions.
Group Questions
In OpenClinica Form Designer, a layout group is a set of questions shown together. Use layout groups to keep related questions on one page, arrange them in a grid, repeat them, or show and hide them together. Layout groups only change how the form looks. Item Groups decide how the data is stored.
- Select the questions. Hold Ctrl to select more than one.
- Click Create group with selected questions.
- Type the group's label in the group header.
- Click the Edit (pencil) icon on the group header to change its settings.
The group settings are:
| Setting | What it does |
|---|---|
| Layout Group Name | The group's internal name. Letters, numbers, and underscores. Not shown on the form. |
| Appearance | Select a card. Standard group shows the questions normally. Same screen keeps the group's questions on one page, even in a multiple-page style. Table list shows the questions as a table, with the shared response choices across the top and one row per question. ℹ️ Note: Table list works only when every question in the group uses the same response list. In Form Designer, each new question gets its own response list, so build the group from one question: create a Select One question with the response options, select it, and copy it with the Duplicate selected questions button in the upper left of Form Designer. The copies share the same response list. Then change each copy's question text. |
| Columns in Grid | Grid styles only. The number of columns that the group's questions are arranged into, from 1 to 10. The default is 4. Available for regular and repeating groups. |
| Repeat this group if necessary | Makes the group repeating, so users can answer the same questions more than once, such as once per medication or adverse event. Adds the Repeat Count tab. |
| Repeat Count | Optional. A number or expression that sets how many times the group repeats, such as ${num_meds}. If blank, users add and remove repeats themselves. If the count goes down, the last repeats are removed. |
| Relevant Logic | Shows or hides the whole group. |
Ungroup or Delete a Group
In OpenClinica Form Designer, you can remove a group and keep its questions, or remove the group and its questions together.
- Click the Delete (trash) icon on the group header.
- In the Delete group dialog, choose one option:
- Ungroup questions: removes the group and keeps its questions on the form.
- Delete everything: removes the group and all of its questions.
The action happens as soon as you click the button. To cancel, close the dialog with X or the Esc key.
Translate a Form into Other Languages
In OpenClinica Form Designer, use Manage Languages to set the form's primary language, add other languages, and enter translations. For step-by-step instructions, see Translate a Form into Other Languages.
Attach Media and External Lists
In OpenClinica, images for response options, scalable vector graphics (SVG) files for hotspot images, and CSV files for external lists are attached to the draft in Study Designer, not in Form Designer.
- Click Save Draft and close Form Designer.
- On the form, open the draft's menu and select Upload Media & External Lists.
- Select all the files the form needs.
- Open the draft in Form Designer again.
The Select One (External List) item type appears in the palette once a file is attached.
Collect Personal Information with PII (Encrypted) Items
In OpenClinica Form Designer, personally identifiable information (PII) items collect information such as a Participant's name or email address and store it encrypted. After adding the item, choose what it collects in Contact Data Type: first name, middle name, last name, email, mobile number, street address 1, street address 2, city, state, country, postal code, full date of birth, secondary ID, or hospital number.
- The form cannot be saved until every PII item has a Contact Data Type. Each type can be used once per form.
- Choosing full date of birth changes the item to a date item.
For more information, see Designing Forms Including PII Data.
Add an eConsent Signature Item
In OpenClinica Form Designer, the eConsent Signature item type adds an electronic consent (eConsent) signature to a form. It is available only when the eConsent module is Active or Pending and the form is in a non-repeating visit event or in the Form Library. For setup steps and rules, see Configure eConsent Forms.
Reuse Questions from the Library
In OpenClinica Form Designer, save questions or groups you use often with Add to library, then insert them into other forms with Add from Library. See Using the Content Library.
Save Drafts and Create Versions
In OpenClinica Form Designer, Save Draft saves your work without changing the study. Drafts are not published and are not recorded in the Study Designer Activity Log. Drafts appear on the form in Study Designer under Drafts, with the newest labeled (latest).
- To turn a draft into a version, select Add to Study from its menu.
- To keep the current version and create a new one, change the Version number in Layout & Settings before saving.
- To discard a draft, select Discard from its menu.
For overwriting versions and the changes that are not allowed after a version is in use, see Versions and Changing Forms After Go-Live.
Key Terms
These are the main OpenClinica terms used in this article.
Item Name: the variable name stored in data extracts.
Item Group: the dataset or domain an item is stored in, such as a CDASH domain.
Layout group: a set of questions shown together on the form. It changes how the form looks, not how data is stored.
Response options: the codelist of answers for a Select One or Select Multiple question, each with a label and a stored value.
Calculate item: a derived variable worked out from other answers. It is not shown on the form.
Relevant Logic: skip logic, also called branching logic, that shows a question only when a condition is true.
Primary language: the language you type the form in, and the language the preview opens in.
Draft: work saved in Form Designer that the study does not use until you add it to the study.
Frequently Asked Questions
How do I change an item's type in OpenClinica Form Designer?
You cannot change the item type of an existing question in OpenClinica Form Designer. Every other setting stays editable. To use a different type, delete the question and add a new one. If the item already exists in another version of the form, give the new question a new Item Name, because an item's data type cannot change between versions.
Why are my questions not side by side in OpenClinica Form Designer?
In OpenClinica Form Designer, questions can sit side by side only in a Grid form style. In Layout & Settings, select Grid / Single page or Grid / Multiple pages. Then put the questions in a group and set each question's Item width, such as Half width for two questions in a 4-column group.
What is the difference between an Item Group and a Layout Group in OpenClinica?
In OpenClinica, an Item Group decides how data is stored: items that share an Item Group are kept together in the data model and in data extracts. A layout group only changes how the form looks, such as keeping questions on one page or side by side. A question belongs to both.
Do Form Designer drafts change my live OpenClinica study?
No. In OpenClinica, a Form Designer draft does not change the study. Drafts are not published and are not recorded in the Activity Log. The study uses the form only after you choose Add to Study from the draft's menu, which makes it a version, and then publish the study.
Related Articles
These OpenClinica articles cover the rest of the form-building process.
- Building Forms in OpenClinica: Start Here: where forms fit in a study and which tool to use.
- Build Your First Form in Form Designer: a step-by-step tutorial that builds a Vital Signs form.
- Build a Form with the Form Template: the Excel spreadsheet alternative, with hard edit checks and cascading selects.
- Item Types and Appearance Reference: every question type and display option.
- Versions and Changing Forms After Go-Live: form versions, and how to bring back an item from an earlier version.
- Form Logic: skip logic, edit checks, required logic, and calculations.
- Write Form Logic with the AI Assistant: get help writing form logic with the AI Assistant.
Was this article helpful?
That’s Great!
Thank you for your feedback
Sorry! We couldn't be helpful
Thank you for your feedback
Feedback sent
We appreciate your effort and will try to fix the article