ℹ️ This page is for study builders, such as Data Managers, who add logic to forms in Form Designer or the Form Template.
Form logic makes your forms "smart": it improves the experience of the people completing the form, promotes cleaner data, and automates calculations. Form logic includes:
- Relevant logic: shows an item or group only when a condition is true
- Validation criteria (constraints): accepts a value only when a condition is true
- Required logic: makes an item required only when a condition is true
- Default values: fills in a starting value when the form is started
- Calculations: sets an item's value from an expression or from values on other forms
- Repeat count: sets how many times a repeating group repeats
- Cross-form logic: uses values from other forms
You write form logic as expressions in XLSForm, the formula language that OpenClinica forms use. You can add form logic in two places:
- Form Designer: the form editor in OpenClinica. You can type an expression yourself or describe what you want in plain language and let the AI Assistant write the expression for you. See the Build a Form in Form Designer article.
- Form Template: a spreadsheet that defines the form, which you upload to OpenClinica. Use it for features Form Designer does not support. See the Building Forms in OpenClinica: Start Here article.
Where to Add Form Logic in Form Designer
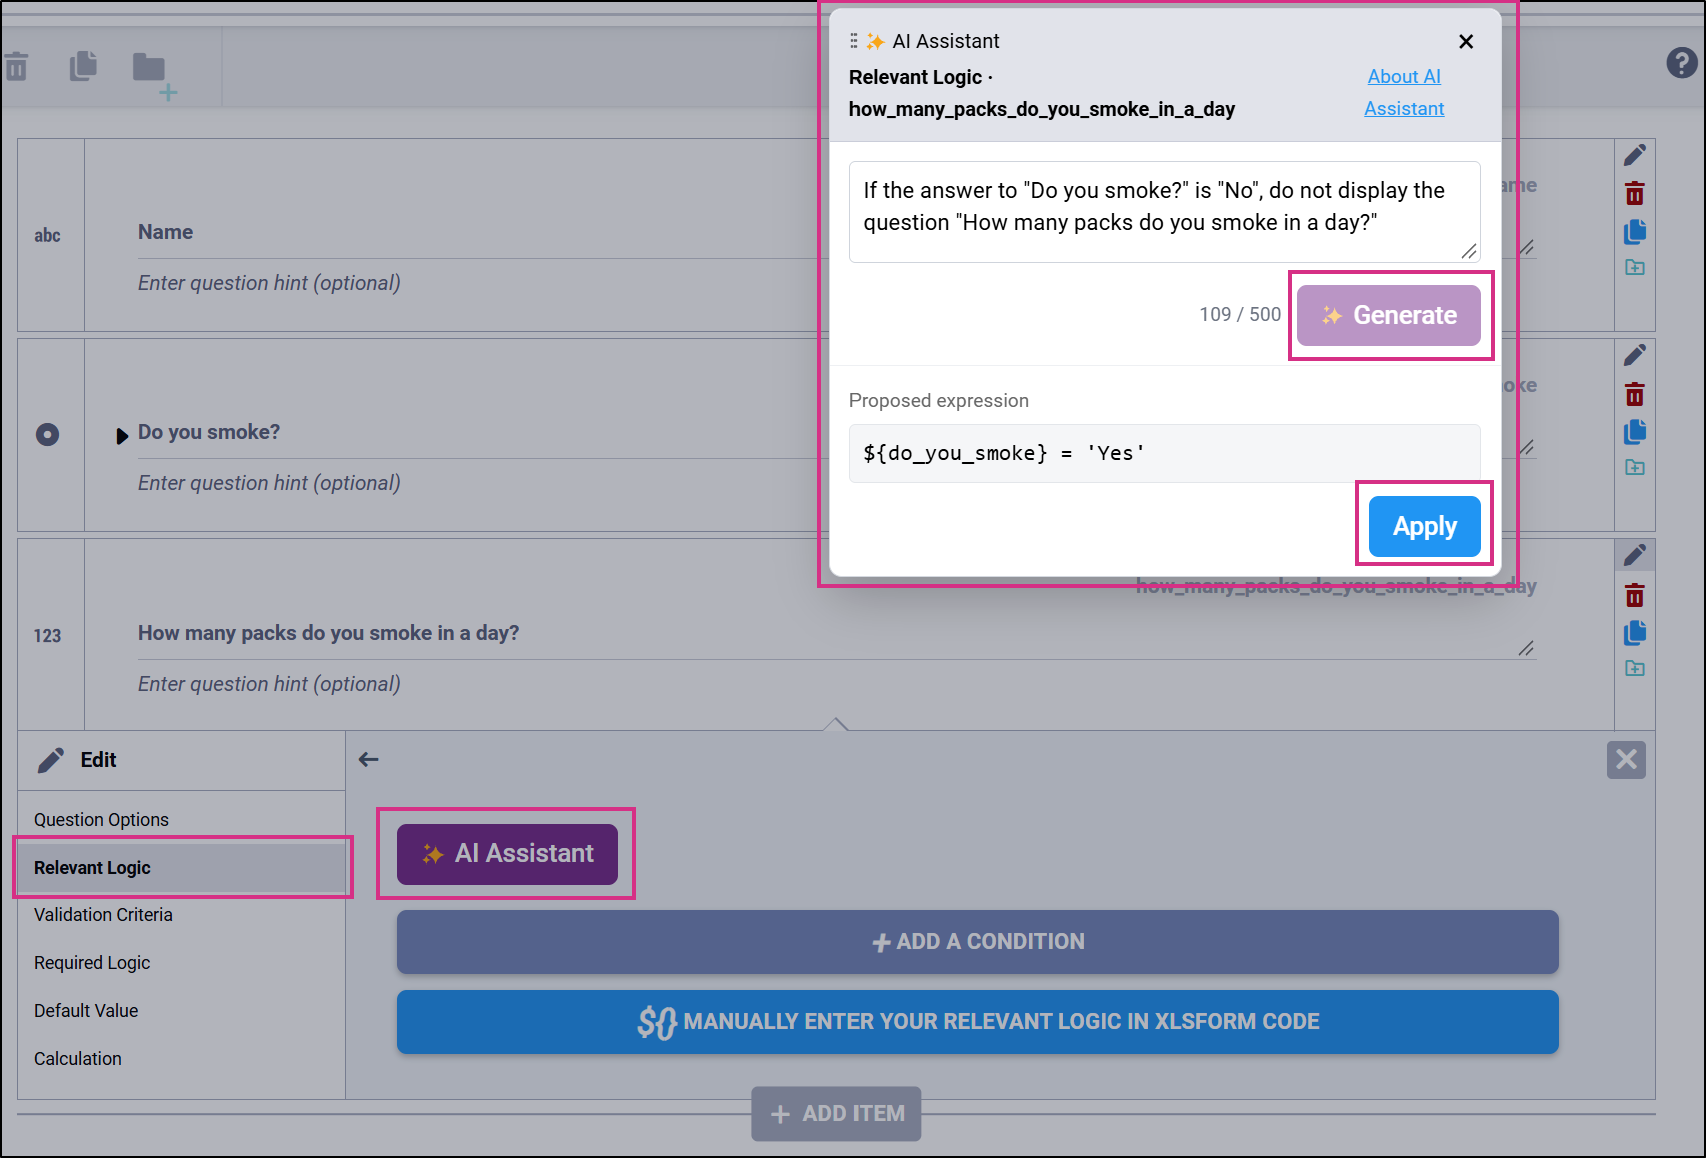
To open an item's settings, click the Edit Question icon on the right-hand side of the item. For a layout group (a set of items grouped together on the form), click the Edit button (pen icon) in the group header. Each type of logic has its own tab. Every logic tab has a heading that asks what the logic controls, short help text, an Expression field, and an AI Assistant button at the right end of the heading.
| Tab | What it controls | The expression must return | Available for |
|---|---|---|---|
| Relevant Logic | When the item or group is shown. Leave it blank to always show it. | True or false | Items and groups |
| Validation Criteria | Which values the item accepts. When the expression is false, the text in the Error message field is shown. | True or false | Items |
| Required Logic | When the item is required. Only needed when Required item is set to Conditional. | True or false | Items, except Calculate items |
| Default Value | The value the item starts with when the form is started. | A value | Items, except note, image, audio, video, file, and eConsent signature items |
| Calculation | The item's value, kept up to date as other items change. | A value | Items, except note, image, audio, video, file, and eConsent signature items |
| Repeat Count | How many times the group repeats. Leave it blank to let users add and remove repeats themselves. | A whole number of 0 or more | Groups where Repeat this group if necessary is selected in the group settings |
- A Calculate item is an item type that holds a calculated value and is not shown to users. You choose it when you add the item.
- Read only is a checkbox on the Question Options tab, not a logic tab. It does not take an expression.
- On the Relevant Logic and Validation Criteria tabs, you can build a condition step by step with + Add a condition, or type the expression yourself after you click Manually enter your relevant logic in XLSForm code (or Manually enter your validation logic in XLSForm code).
Find Item Names and Choice Names
Form logic refers to items and choices by their names, not by the text users see.
- Item name: shown in the Item Name field on the item's Question Options tab. It is not the question text. For example, the question "What is the participant's sex?" can have the item name sex.
- Choice name: the value that is stored when a user selects a choice. It is not the choice label users see. For example, the choice labelled "Female" can have the name female or 2. Put text choice names in quotes ('female'). Do not put numeric choice names in quotes (2).
Set Whether an Item Is Required
On the Question Options tab, set Required to one of these options:
- Always: the item is always required.
- Never: the item is never required.
- Conditional: the item is required only when the expression on the Required Logic tab is true.
The Required Logic tab shows the current setting, for example Currently: Conditional.
If you change Required from Conditional to Always or Never while the Required Logic tab contains an expression, the message "This will discard the current conditional Required expression. Continue?" appears. Click Confirm to remove the expression, or Cancel to keep Conditional and the expression.
If you add an expression on the Required Logic tab while Required is set to Always or Never, the message Set Required to Conditional? appears. Click Set Conditional to keep the expression. If you click Cancel, the expression is removed.
Write Form Logic with the AI Assistant
The AI Assistant writes a form logic expression from a plain-language description. For how to use it, see the Write Form Logic with the AI Assistant article.
Check Expression Syntax
Form Designer checks the syntax of each expression and shows any errors in red below the Expression field. The check runs:
- When you click Apply in the AI Assistant
- When you leave an Expression field after typing in it
The check finds unpaired parentheses, brackets, and braces, text values with a missing quote, and references to items that do not exist on the form. It does not check function names or whether the logic does what you intended.
| Error message | How to fix it |
|---|---|
| Missing opening parenthesis "(" for existing closing parenthesis ")". Parentheses must be used in pairs in logical groupings and function calls. | Add the missing ( or remove the extra ). |
| Missing closing parenthesis ")" for existing opening parenthesis "(". Parentheses must be used in pairs in logical groupings and function calls. | Add the missing ) or remove the extra (. |
| Missing opening bracket "[" for existing closing bracket "]". Brackets must be used in pairs in logical groupings. | Add the missing [ or remove the extra ]. |
| Missing closing bracket "]" for existing opening bracket "[". Brackets must be used in pairs in logical groupings. | Add the missing ] or remove the extra [. |
| Missing { in item reference. Item references must use braces in pairs like: ${itemname} | Write the item reference as ${itemname}. |
| Missing } in item reference. Item references must use braces in pairs like: ${itemname} | Write the item reference as ${itemname}. |
| Missing ' for text value. Literal text values must either start and end with a single quote character (') or start and end with a double quote character ("). | Put matching quotes at both ends of the text value, for example 'female'. |
| Missing " for text value. Literal text values must either start and end with a double quote character (") or start and end with a single quote character ('). | Put matching quotes at both ends of the text value, for example "female". |
| Invalid item reference ${itemname}. There is no item on this form with item name defined as itemname. | Check the spelling of the item name, or add the item to the form. |
Test Your Form Logic
- In Form Designer, click the Preview Form icon in the upper-left corner.
- Enter values that should make each condition true, and values that should make it false.
- Check that items appear and disappear, error messages show, required items are enforced, and calculated values are correct.
- If the logic does not work as expected, close the preview, correct the expression, and click Save Draft.
When the logic works as expected, add the draft form to your study. Click the Menu icon next to the draft and select Add to Study. See the Build a Form in Form Designer article.
Write Form Logic Expressions
When you write expressions for form logic, you must use the correct syntax, including punctuation and spaces. Form logic is not case-sensitive.
Referencing Items
An expression can refer to the value of the current item or of another item on the form. It can also compare those values with literal values, such as 'yes' or 1.
| Syntax | Description | Example |
|---|---|---|
| . | References the current item's value. | The expression . >= 18 and . <= 65 on an age item's Validation Criteria tab shows the configured error message if a value outside of the 18 to 65 range is entered. |
| ${itemname} | References the value of another item on the form where itemname is the name of that item. | The expression ${sex} = 'female' on a pregnancy question's Relevant Logic tab shows the question only if the participant is female. |
To use values from other forms (cross-form logic), see the Crossform References section of the Build a Form with the Form Template article.
Conditions
| Description | Syntax |
|---|---|
| Numeric Value | ${itemname} = value |
| String Value | ${itemname} = 'value' ${itemname} = "value" ${diagnosis} = "alzheimer's" (double quotes, because the value contains a single quote) |
| Null Value [Empty String] | ${itemname} = '' |
| Multiple Select Numeric Value(s) | selected(${itemname}, choicename) |
| Multiple Select Character Value(s) | selected(${itemname}, 'choicename') |
To check for more than one choice, repeat the condition and join the copies with and or or. For example: selected(${symptoms}, 'fever') or selected(${symptoms}, 'cough'). This would be true if the item value contains ‘fever’, ‘cough’, or both.
Operators & Boolean Logic
| Description | Syntax |
|---|---|
| Addition | + |
| Subtraction | - |
| Multiplication | * |
| Division | div |
| Modulus (remainder) | mod |
| Equal | = |
| Not Equal | != |
| Less Than | < |
| Less Than or Equal to | <= |
| Greater Than | > |
| Greater Than or Equal to | >= |
| Manipulating the order of operations | ( ) |
| All must be true | and |
| At least one must be true | or |
- and: the expression is true only if every condition is true. Example: ${age} >= 18 and ${consent} = 'yes'.
- or: the expression is true if at least one condition is true. Example: ${smoker} = 'yes' or ${former_smoker} = 'yes'.
- ( ): parentheses control the order of operations. You can also use them to make an expression easier to read. Example: (${enddate} - ${startdate}) * 2.
- mod: returns the remainder after division. Example: ${number} mod 2 = 0 is true when the number is even.
Calculations
Enter the formula from the syntax column on the Calculation tab (Form Designer) or in the Calculation column (Form Template). Replace the item names in the syntax with the names of your own items. You can also use the AI Assistant on the Calculation tab.
Control When a Calculation Runs
Use the Triggered by dropdown below the Expression field on the Calculation tab.
| Triggered by setting | When the calculation runs | Can users edit the value? |
|---|---|---|
| No specific trigger (always recalculate) (default) | Whenever any data in the form changes, and every time the form is opened for editing | No. The calculation overwrites any edit. On items users can see, the item must be read-only. |
| A specific item, excluding Calculate items | Only when that item's value changes | Yes. A user's edit is overwritten only if the trigger item's value changes. |
Calculations on Items Users Can See
You can add a calculation to any item type except note, image, audio, video, file, and eConsent signature items. If the item is not a Calculate item and no trigger is selected, the calculation overwrites anything a user enters. In this case, the item must be read-only. Form Designer shows this message in red under the Calculation field until you fix it:
"This item must be read-only because its calculation has no trigger. Select Read only on the Question Options tab, or select a trigger item below."
To fix it, do one of the following:
- On the Question Options tab, select Read only.
- On the Calculation tab, select an item from the Triggered by dropdown.
Calculation Examples
| Calculates | Key | Syntax |
|---|---|---|
| BMI (adjusting for Metric or Imperial, and rounding to 2 decimal digits) | weight = weight in lbs or kgs height = height in cm or in wh_units = weight and height units (1 for cm and kgs, 2 for in and lbs) | round(if(${wh_units} = 2 and ${weight} != '' and ${height} != '', 703 * ${weight} div (pow(${height}, 2)), if(${wh_units} = 1 and ${weight} != '' and ${height} != '', 10000 * ${weight} div (pow(${height}, 2)), 0)), 2) Alternatively: round(if(${weight} != '' and ${height} != '', if(${wh_units} = 1, 10000 * ${weight} div (pow(${height}, 2)), 703 * ${weight} div (pow(${height}, 2))), 0), 2) |
| Mean Arterial Blood Pressure (MAP) | systolic = systolic blood pressure diastolic = diastolic blood pressure | (${systolic} + (2 * ${diastolic})) div 3 |
Default Values
A default value fills in an item automatically when the form is started. For an item in a repeating group, it also fills in the item in each new repeat. Enter a default value on the Default Value tab. It can be:
- A constant value, such as 1 or 'text'
- An XLSForm expression, such as today() to fill in today's date
The default value is applied only once. If a user changes the value or clears it, the default value is not filled in again, even after the form is closed and reopened. It is applied again only if the whole form is cleared in Study Runner (the application where site users enter data) and started again.
- Relevant Logic: ${triggeritem} = 1
- Calculation: once(if(${triggeritem} = 1, today(), .))
- Triggered by: triggeritem
The once() function keeps the value from being calculated again if the trigger item changes later.
Related Articles
- Build a Form in Form Designer
- Build a Form with the Form Template
- Functions
- Create a Study
- Events & Forms
- Designing Forms Including PII Data
- Write Form Logic with the AI Assistant
Was this article helpful?
That’s Great!
Thank you for your feedback
Sorry! We couldn't be helpful
Thank you for your feedback
Feedback sent
We appreciate your effort and will try to fix the article